


Why Upgrade to a Performance Intercooler?
Let’s start with the basics. An intercooler’s job is to cool the compressed air coming out of your turbocharger before it enters the engine. Cooler air means denser air, and denser air means more oxygen for combustion. More oxygen? More power. Simple physics.
Most factory intercoolers are designed for noise reduction and cost efficiency rather than optimal thermal performance. Once you start pushing your boost levels beyond stock figures—or you’ve remapped your ECU—your OEM intercooler quickly becomes a bottleneck. Heat soak becomes a problem, intake temps rise, and you start losing power lap after lap or gear after gear during enthusiastic drives.
Installing a performance intercooler helps you maintain consistent intake temps, avoid heat soak, and maximize gains from your turbo setup. Whether you’re chasing better numbers on the dyno or reliability under track stress, a larger and better-flowing intercooler is a must-have upgrade.
Tools & Parts You’ll Need
Before digging into the install, make sure you’ve got everything on hand. There’s nothing worse than having your bumper torn off and realising you’re a clamp short.
- Socket wrench set (metric)
- Flat-head and Phillips screwdrivers
- Trim removal tool
- Floor jack and jack stands
- Torque wrench
- Silicone hoses/couplers
- T-bolt clamps (stronger than OE worm clamps)
- Your upgraded intercooler kit, obviously
- Possibly a Dremel or angle grinder (more on that below)
Prep Work: Getting Ready
First rule of any install—give yourself time. Don’t plan this the night before a track day or big road trip. You’ll want a clean, open space to work in, ideally with good overhead lighting. Get the vehicle on jack stands so you’ve got room to manoeuvre underneath the front end.
If your intercooler kit didn’t come with a step-by-step guide specific to your car, check enthusiast forums or YouTube. Chances are, someone’s done it and documented it. That said, let’s go through the general process for most turbocharged platforms.
Removing the OEM Intercooler
Start by removing the front bumper. That usually involves unbolting the wheel arch liners, removing a few tabs and bolts across the top of the grille, and sometimes unclipping fog lights or sensors. Be gentle with plastic clips—they love to snap at the worst time.
Once the bumper is off, the intercooler will either be sandwiched between the AC condenser and radiator (“shared core” setup), or it’ll sit in front of them (“front-mounted”). Disconnect all boost piping from the intercooler. Be prepared for a bit of oil residue—perfectly normal due to PCV blow-by.
Unbolt the brackets securing the stock intercooler and carefully lower it out. Some OEM units are annoyingly heavy considering how little they do thermally.
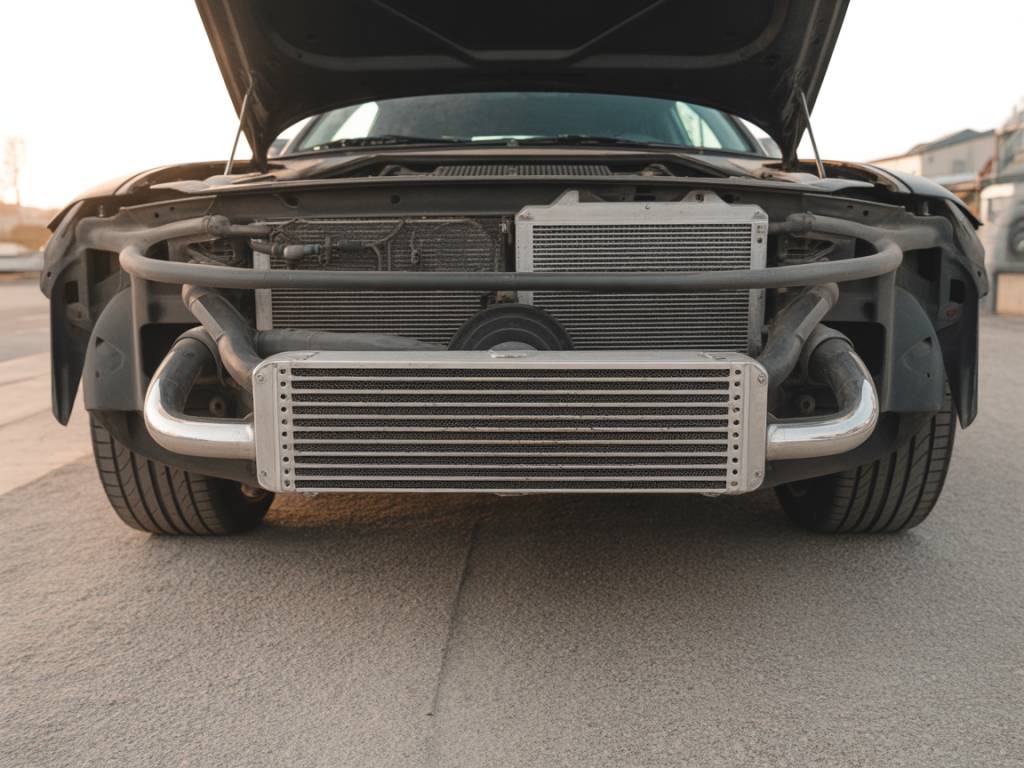
Fitting the Performance Unit
This is where things get interesting. A good performance intercooler will be significantly larger than OEM, so clearances might be tight. Test-fit before clamping anything down. Some models will bolt right on, others will need custom brackets or slight trimming of the bumper support or lower grille.
Here’s a real-world example: On a Mk7 Golf GTI I worked on recently, the aftermarket intercooler (Airtec) was about twice the core volume of stock. It required minor trimming to the lower grille fins for proper fitment but slotted straight into the original mounting points. Gains? 25°C lower intake temps under load and zero heat soak on repeat pulls.
Use high-quality silicone couplers and T-bolt clamps to ensure a leak-free seal. Cheap couplers tend to balloon under pressure, and worm clamps just don’t deliver consistent pressure. Tighten everything to spec with a torque wrench if available.
Modifying for Clearance
Depending on your vehicle and intercooler design, you might need to trim some plastic from the crash bar, ducts, or fan shrouds. Use a Dremel or angle grinder, and always wear eye protection. Take your time—cut once, not twice.
Be especially mindful of airflow direction. Blocking air passages or installing the intercooler at an angle can reduce its efficiency. A performance intercooler only works well if it gets adequate airflow across the fins. If necessary, reroute ducts or trim the bumper insert for better exposure.
Reinstalling the Bumper
Once everything is bolted down and all piping is secure, test-fit the front bumper. This is where many realise that big, high-flow cores don’t always play nice with stock bumper designs. If you need to trim internal plastic or shave down grille slats, do it gradually and symmetrically—it’s not just about fit; it’s about keeping the OEM appearance clean and stealthy if that’s your preference.
Reconnect foglights, sensors, and secure all fasteners. Double-check that nothing is rubbing and that hoses have at least a few millimeters of clearance from fans, belts, or frame components.
Pressure Test & First Start
Before starting your engine, I strongly recommend running a boost leak test. Cap one end of the intake piping and apply low pressure (10-15 PSI) using a compressor and a boost leak tester. Listen for hissing or use soapy water around joints to detect leaks. Fix any leaks before proceeding—no point installing an intercooler if you’re losing boost due to a loose clamp.
Start the engine and keep it at idle. Watch for any unusual noises, vibrations, or fault codes. Some ECU platforms might need a short adaptation run before settling into new fueling/boost trims with the cooler air charge.
Post-Install Performance Insights
After installing a performance intercooler, you may not immediately feel a dramatic seat-of-the-pants difference, especially if your ECU is running a conservative boost map. But give it time—or better yet, run back-to-back logs or data from an OBD2 reader or something like a Cobb Accessport. You’ll see the intake air temps are noticeably lower and stay consistent even after multiple back-to-back pulls.
On my Fiesta ST track build, swapping out the factory top-mount intercooler for a front-mounted unit dropped charge temps by over 35°C under heavy load. That translated to smoother throttle response and more consistent timing on hot days—no more “pulling” knock timing mid-session.
Final Thoughts
If you’re serious about tuning your turbocharged engine, a decent intercooler isn’t optional—it’s foundational. The install process isn’t overly complex, just time-consuming. Take it slow, plan your cuts and fits carefully, and double-check your plumbing. The payoff? Cooler temps, consistent performance, and a car that’s noticeably more resilient under hard use.
Have any install tips of your own or ran into a unique challenge with a specific make/model? Drop it in the comments—always happy to hear how others handled their builds.